What are data models?
Table of contents
Data models
Zendro takes as input a set of data models described in JSON files, from which it automatically generates both the backend and the GUI of a custom data warehouse. To get started, you need a conceptual model or schema of your database, including entities, attributes and their relationships. Each data model, that is, each entity with its corresponding attributes and associations to other entities, must be defined as a JSON object in a separate file according to the specifications below. Zendro supports the standard associations One-to-One, One-to-Many, and Many-to-Many, between data models stored either locally or remotely, which we’ll also describe in detail. But first, let’s introduce an example that will help illustrate model requierements throughout the guide.
An example
Let’s assume we want to create a small database for a herbarium of medicinal plants. We need data models for specimens, taxonomic information, collection information, and uses (Figure 1). In our case, the taxonomic information is specific to each plant, so there is a One-to-One association between specimen and taxon. Each plant can have many uses, just like there are many plants that can serve the same function, so the association between specimen and uses is Many-to-Many. Finally, a specimen belongs to one collection only, but a collection may store multiple specimens, so there is a One-to-Many association between these models (Figure 1).
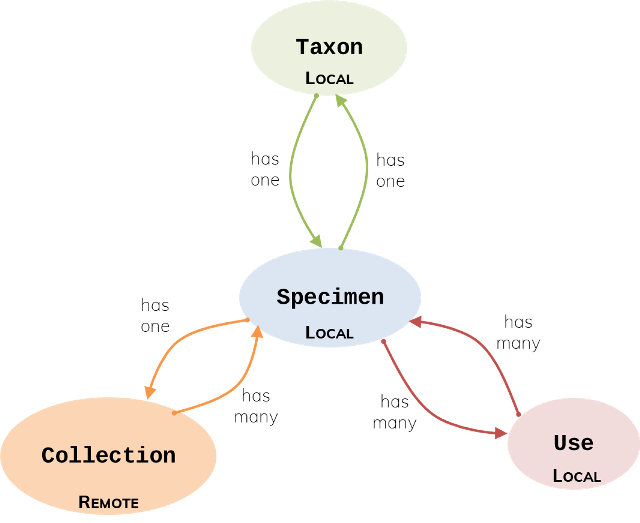
In this example, information about specimens, taxonomic data and uses is stored in a local server. But we will assume that the information about collections is in a remote database, perhaps one that holds other types of plants, and we would connect to that database to access only the attributes we are interested in.
Next, we need to list the attributes of each model and their data types (Figure 2). Allowed data types are: String, Int, Float, Boolean, Date, Time and DateTime. Each model also requires an attribute that serves as the primary key or unique identifier of each record.
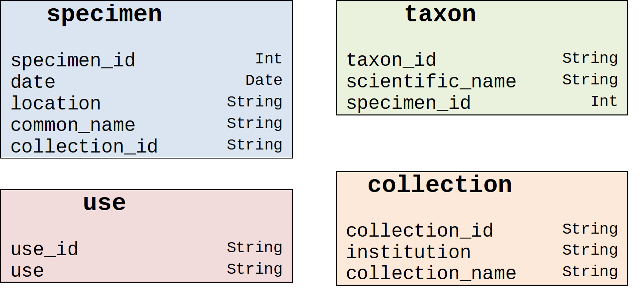
Foreign keys are also needed to establish the associations to other data models; their location depends on the association type. Note that in Many-to-Many associations, it is necessary to define an additional model for the cross table of foreign-key pairs that define the association. For more details, please read the documentation on associations in Sequelize, on which Zendro is based.
From conceptual model to JSON
To translate the conceptual diagram into JSON, we need follow the JSON specifications. We present two complete examples below.
// Taxon Model
{
    "model": "taxon",

    "storageType": "sql",

    "attributes": {
        "taxon_id": "String",
        "scientific_name": "String",
        "specimen_id": "Int"
    },

    "associations": {
        "specimen_information": { // give your association an informative name
            "type" : "one_to_one",
            "implementation": "foreignkeys",
            "reverseAssociation": "taxon_information", // The name of the reverse association defined in the specimen model
            "target": "specimen",
            "targetKey": "specimen_id",
            "keyIn": "taxon",
            "targetStorageType": "sql",
            "label": "common_name",
        },
    },

    "internalId": "taxon_id"
}
// Collection Model
{
    "model": "collection",

    "storageType": "generic",

    "attributes": {
        "collection_id": "String",
        "institution": "String",
        "collection_name": "String"
    },

    "associations": {
        "medicinal_plants": {
            "type" : "one_to_many",
            "implementation": "foreignkeys",
            "reverseAssociation": "collection",
            "target": "specimen",
            "targetKey": "specimen_id",
            "keyIn": "specimen",
            "targetStorageType": "sql",
            "label": "common_name",
            "sublabel": "date"
        },
    },
Data upload
Once the database is generated, you can upload data from a csv file to a Zendro instance directly through the GUI or the Zendro CLI.
Data format requirements
Data to populate each model in your schema must be in a separate CSV file, following the format requirements below:
- Column names in the first row must correspond to model attributes. And for associations, the format of a column name is like
add<associationName>, e.g.addCountriesfor assciationNamecountries. - Empty values should be represented as
"NULL". - All fields should be quoted by
". However, if field delimiter and array delimiter do not occur in fields with String type, namely characters could be splitted without ambiguity, then each field could not be quoted. For example, if the field delimiter is comma, and one String field is likeZendro, excellent!. Without the quotation mark, this field would be splitted as two fields. So in such case these String fields must be quoted. - Default configuration: LIMIT_RECORDS=10000, RECORD_DELIMITER=”\n”, FIELD_DELIMITER=”,”, ARRAY_DELIMITER=”;”. They can be changed in the config file for environment variables.
- Date and time formats must follow the RFC 3339 standard.
GUI
To upload the CSV/XLSX/JSON file through the GUI, go to the model on the left-side panel and use the import button. It will ask you to select a file from your computer and automatically fill the table. If you want to modify default configuration for delimiters and batch size, you can find them in single-page-app/.env.development or single-page-app/.env.production.
Zendro CLI
To upload a file, you can utilize Zendro CLI:
- If the Zendro instance is on your local machine, you can directly go into the folder
graphql-serverand executezendro bulk-create -f <filename> -n <modelname> -s <sheetname>, e.g.zendro bulk-create -f ./country.csv -n country. Three formats are supported here, namely CSV, XLSX and JSON. And the paramtersheetnameis only used for XLSX file. If it is empty, by default records in the first sheet would be imported. And the default configuration for delimiters and record limit, you can find them ingraphql-server/.env. - If you want to upload a file to a remote Zendro server, it is also possible via Zendro CLI. All configuration could be modified in the file
zendro/.env.migration. After the configuration, you can executezendro bulk-create -f <filename> -n <modelname> -s <sheetname> -r, e.g.zendro bulk-create -f ./country.csv -n country -r.
Note: if the validation of records fails, the log file would be stored in the folder of the uploaded file and its name would be like errors_<uuid>.log.
Data download
In general, it is possible to download all data into CSV format in two ways, either using the Zendro CLI or the Zendro Single Page App. Here every attribute will be quoted to avoid ambiguity and enable seamless integration with the zendro bulk creation functionalities. And column names for foreign keys would be like add<associationName>. For example, there is an association named countries, which includes a foreign key called country_ids, then the column name for country_id should be addCountries.
Single Page App
It is convenient to download records by clicking the download button. Here, it is possible to modify the default configuration for delimiters and record-limit, which are used for generating lines in the resulting CSV file. To configure, see the corresponding environment variables in single-page-app/.env.development or single-page-app/.env.production.
Be aware that when modifying the NEXT_PUBLIC_ZENDRO_MAX_RECORD_LIMIT environment variable, to do so in the backend graphql-server (LIMIT_RECORDS) as well.
Zendro CLI
There are two options to download records through Zendro CLI:
-
If the Zendro instance is installed locally, then user can execute the command in the
graphql-serverfolder:zendro bulk-download -f <filename> -n <modelname>. To configure delimiters (ARRAY_DELIMITER,FIELD_DELIMITERandRECORD_DELIMITER) and record-limit (LIMIT_RECORDS), set the according environment variables ingraphql-server/.env -
If the Zendro instance is accessible remotely, modify the
zendro/.env.migrationconfiguration file to map to the remote Zendro instance. After that, executezendro bulk-create -f <filename> -n <modelname> -rto download the records to CSV.