Distributed Data Models
Zendro provides the ability to build a network of Zendro graphql-servers, able to talk to and request data from each other, as long as the GraphQL schema for a given model is identical across all Zendro instances in the cloud of graphql-servers.
To do so, define your data model with storageType distributed-data-model (ddm), and provide Zendro with adapters to either a local storage database or another Zendro instance to query for data. Since Zendro’s data model definitions aim to be atomic and independent of any other model, those adapters have to be defined as separate data models, even though they are linked to the distributed-data-model (ddm). Only the ddm is exposed to the GraphQL schema; the adapters are used internally to request the expected data.
Table of contents
- Data model definition
- Functionality
- Network topologies
- Performance and limitations
- Authorization and authentication
Data model definition
Defining a distributed-data-model (ddm) and its adapters requires some special attributes in the model definition:
| Name | Type | Description |
|---|---|---|
| registry | String[] | List of registered adapters the ddm should request |
| internalId | String | While optional in basic models, ddms require a String identifier attribute, instead of e.g. the default numeric sequence. |
| adapterName | String | Only used in adapter definitions. References the name given in the registry list. The adapterName must be kept consistent and unique across your Zendro nodes, meaning it should always point to the same endpoint. |
| regex | String | Only used in adapter definitions. Regular expression used to identify the adapter a specific record belongs to (using its internalId). Used to identify the responsible adapter for read-one and write actions. |
| url | String | Only used in ddm-adapter definitions. URL of the graphql-server to forward the requests to. |
Below is an example of a distributed “country” model, with two adapters: a “local” adapter that connects directly to a relational database, and a “remote” adapter that simply forwards the request to the next Zendro node in the network, given a URL. Each adapter the distributed-data-model should be aware of needs to be defined in a separate JSON data model definition file.
// Country definition File
{
  "model": "country",
  // set the storage-type to distributed-data-model
  "storageType": "distributed-data-model",
  // Use the "registry" key to register a list of adapters you want this
  // specific model to be aware of.
  "registry": ["country-server1","country-server2"],
  // distributed data-models have to use an internalId of type String. This is
  // so the model can differentiate between the registered adapters using the id
  // and a regular expression.
  "internalId": "id",
  "attributes": {
    "id": "String",
    "name": "String",
    "population": "Int"
  }
}
// Country local adapter file
{
  // Use the same name as above "ddm" definition
  "model": "country",
  // set the storage type to the desired type and add a "-adapter" to signal
  // that this model functions as an adapter.
  "storageType": "sql-adapter",
  // Reference the name given in the "registry" list of the
  // distributed-data-model above
  "adapterName": "country-server1",
  // Regular expression to determine whether a record can be fetched using this
  // adapter. In this example the ids of country-records stored on this local
  // sql-adapter use a "/countries/server1" signature.
  "regex": "/countries/server1",
  // distributed data-models have to use an internalId of type String. This is
  // so the model can differentiate between the registered adapters using the id
  // and a regular expression.
  "internalId": "id",
  // The adapter uses the same attributes defined in the above
  // distributed-data-model definition
  "attributes": {
    "id": "String",
    "name": "String",
    "population": "Int"
  }
}
{
  // Use the same name as above "ddm" definition
  "model": "country",
  // The ddm-adapter type is used to signal zendro that this adapter forwards
  // the request to another zendro instance. The other zendro instance also has
  // a registered distributed-data-model which then handles the request
  // accordingly (e.g. ask its registered local mongodb-adapter for data).
  "storageType": "ddm-adapter",
  // The graphql-server URL of the remote zendro instance, used to forward the
  // incoming request.
  "url": "http://<server2>/graphql",
  // Reference the name given in the "registry" list of the
  // distributed-data-model above
  "adapterName": "country-server2",
  // Regular expression to determine whether a record can be fetched using this
  // adapter. In this example the ids of country-records stored on this local
  // sql-adapter use a "/countries/server2" signature.
  "regex": "/countries/server2",
  // distributed data-models have to use an internalId of type String. This is
  // so the model can differentiate between the registered adapters using the id
  // and a regular expression.
  "internalId": "id",
  // The adapter uses the same attributes defined in the above
  // distributed-data-model definition
  "attributes": {
    "id": "String",
    "name": "String",
    "population": "Int"
  }
}
Functionality
Zendro’s distributed-data-models work by distributing incoming requests to the corresponding responsible adapters. When a user sends any GraphQL request (query or mutation), the distributed-data-model (ddm) passes it along to its registered adapters, collects the results and post-processes any necessary modifications in memory (e.g. sorting all results fetched from different adapters).
For read-one and write actions, the ddm recognizes the responsible adapter via the given regular expression on the internalId field. Each adapter exposes a simple function to recognize whether it is responsible:
/**
 * recognizeId - test whether this adapter is responsible for a given iri (id).
 * It does this via a simple match of a regular expression.
 * @param {string} iri - The iri to test
 * @return {boolean} returns true if match, false otherwise
 */
static recognizeId(iri) {
  return iriRegex.test(iri);
}
This function can be customized separately for each adapter — instead of a regular expression, any function that returns a boolean given an id can be used.
Once the responsible adapter is found, the ddm forwards the request to it, collects the result, and returns it to the user.
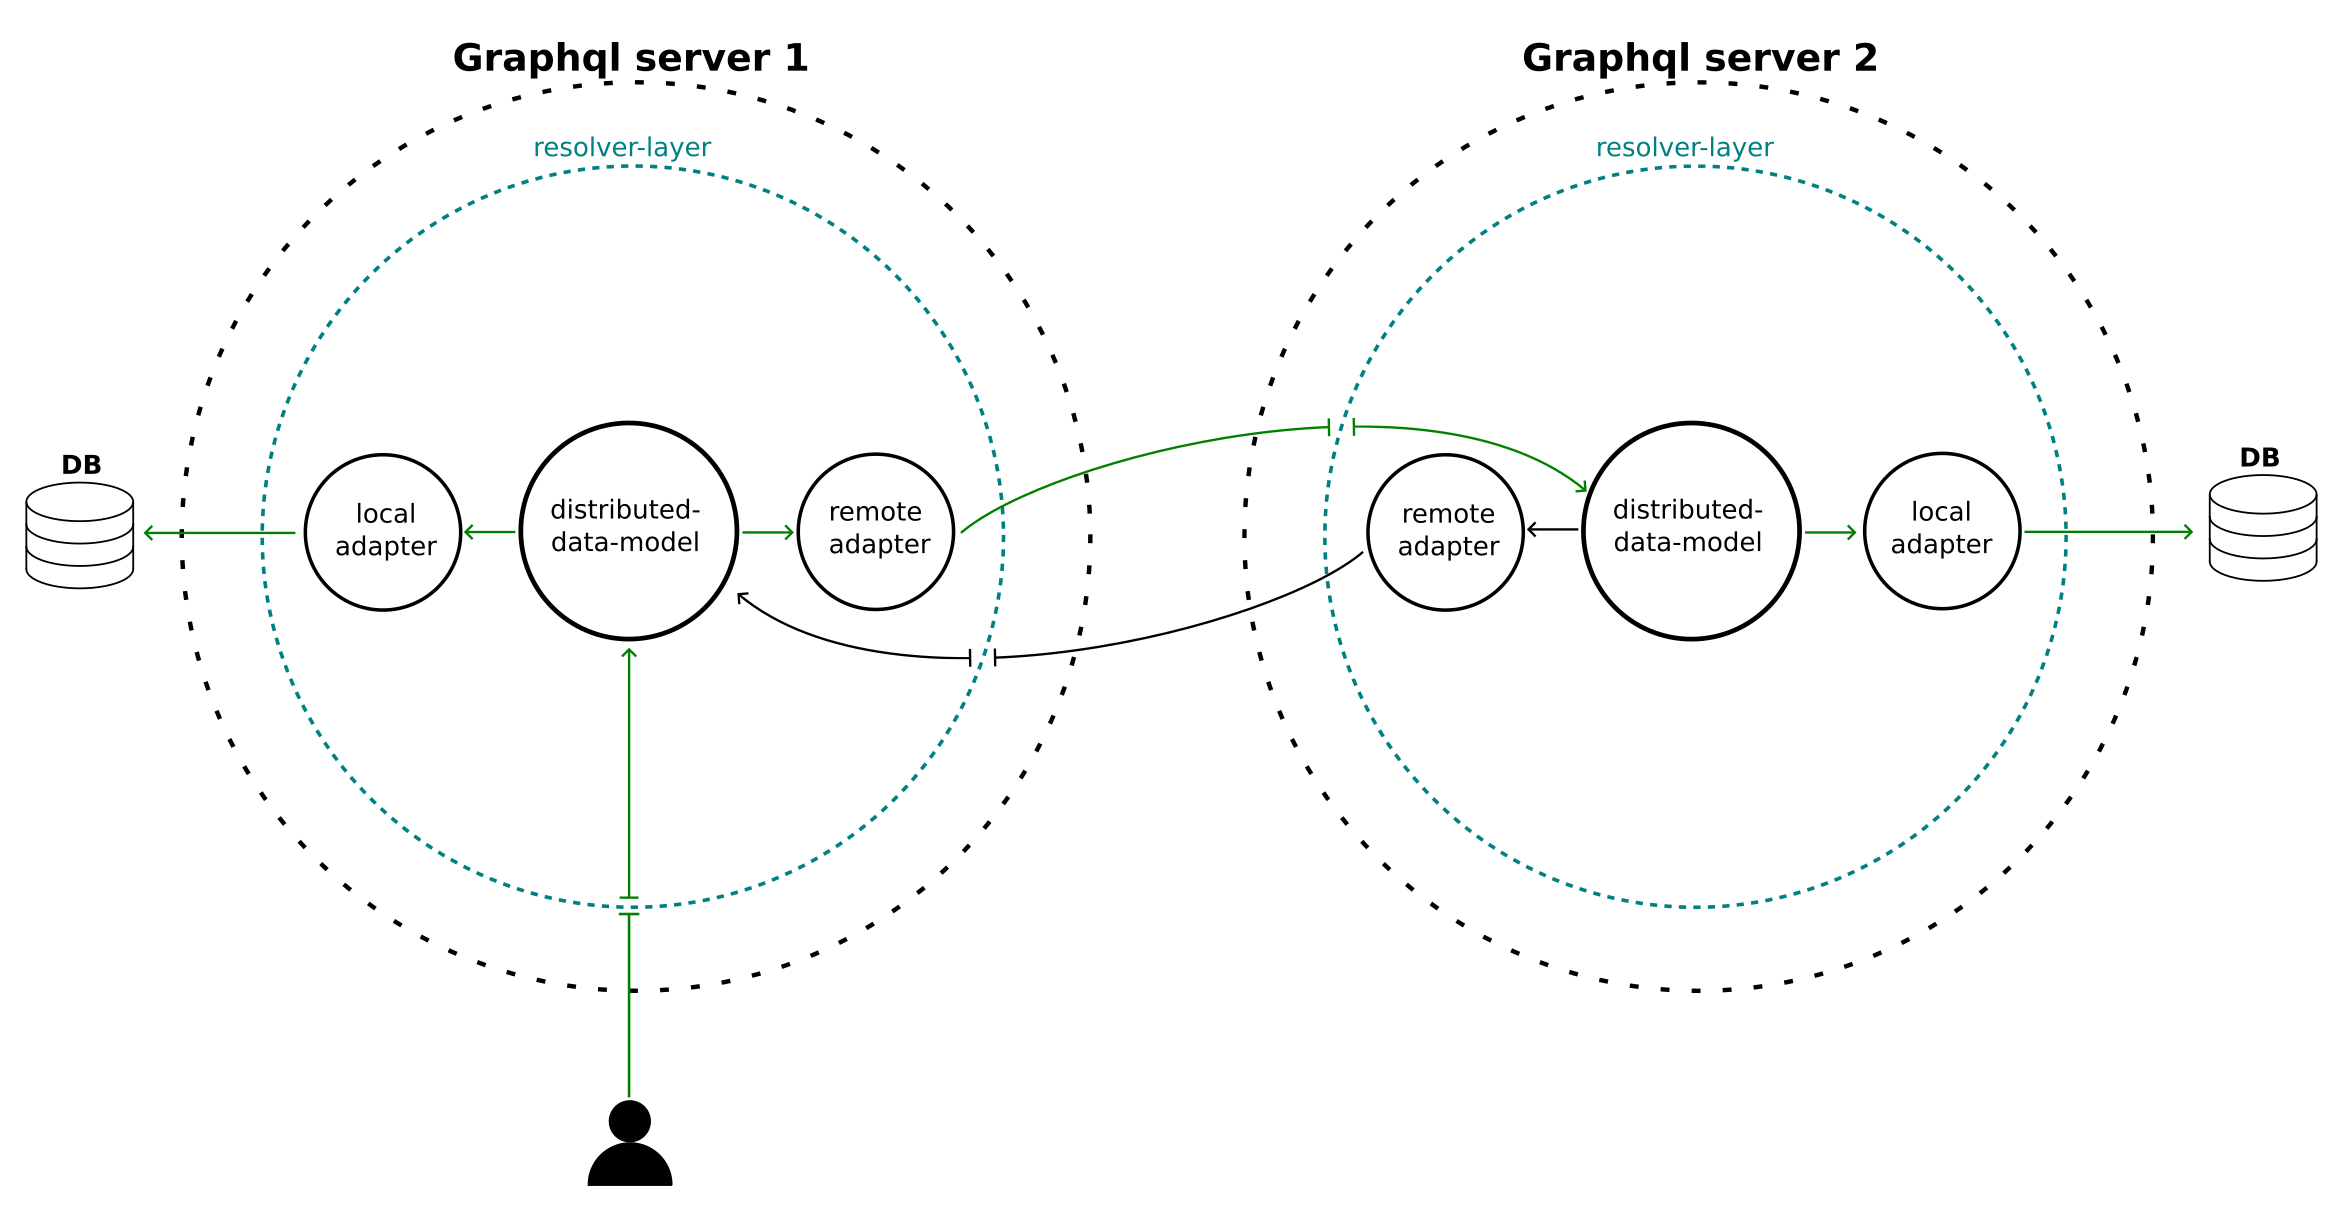
For a read-many function, the ddm queries all registered adapters for the data, passing along any query parameters given (search, order, pagination), collecting the results and returning them to the user. Errors from querying different nodes in the network are passed along and displayed as benign, while data from working nodes is still returned. An example of a two-server Zendro network:
 |
|---|
| A depiction of a two-server Zendro network using distributed-data-models. The green arrows show the flow of a request to “Graphql server 1”. The user requests some data, and after passing the resolver layer for authorization checks, the “distributed-data-model” forwards the request to its 2 registered adapters: one “local” adapter which immediately queries a database, and one “remote” adapter which forwards the GraphQL request to “Graphql server 2”. This in turn goes through the resolver of Graphql Server 2, and is again distributed to the registered adapters by the “distributed-data-model” there. Zendro automatically prevents a circular request by not sending the request back through the “remote adapter” of server 2 — but the “local adapter” of server 2 queries its connected database and returns the data to the user. After collecting all data, the distributed-data-model on server 1 does any necessary post-processing, like sorting, and returns the data to the user. |
Cursor-based pagination
To make sure distributed-data-models can be paginated efficiently, they only support cursor-based pagination — see the Pagination argument documentation for more information. Since the ddm fetches data from multiple sources and databases, the classic limit-offset based pagination cannot be used. Instead, when requesting paginated data, Zendro sends along a cursor (a base64 encoded record) and the amount (first or last x records) to all data sources, and fetches data after or before that cursor. Once all returned data is collected, a final pagination step (to the first or last number of requested records) happens in memory and is sent to the user.
Network topologies
Depending on the use case, several different “Zendro network” topologies can be achieved by configuring the data model definitions on each participating Zendro instance. Below are two examples of possible setups; this list is not exhaustive. Zendro prevents circular requests by excluding adapters that have already been queried.
Example 1: Mesh topology
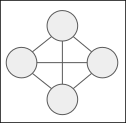
A mesh topology, where each participating Zendro node has access to all other Zendro nodes in the network, can be achieved simply by making all nodes aware of each other. In practice, that means every Zendro instance has a model of storageType “distributed-data-model”, a ddm-adapter for every Zendro node in the network, and, if it exists, an adapter to local storage. No matter which node a user requests data from, every node in the network returns the data stored at its local site, and the end result includes data from all Zendro nodes in the network.
Example 2: Master-slave topology
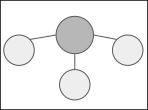
A master-slave topology, where one Zendro node acts as a central controller, can be achieved by only making the central node aware of the other instances. Only that node defines a model of storageType “distributed-data-model” and ddm-adapters for each node in the network; all other secondary nodes do not need a “distributed-data-model”. That means only when querying the central node does data from all other nodes get returned — if a user queries one of the secondary nodes, only data specifically from that node is returned.
Performance and limitations
Zendro ensures the performance of any distributed setup through multiple strategies.
First and foremost, the overhead of distributing an incoming request to multiple adapters is kept to a minimum. Due to the paginated nature of the results collected at the distributed-data-model, post-processing the data in memory is usually very fast — the collected result only has to be sorted and paginated once from the individual adapter results. All parameters (search, order, pagination) are forwarded to the adapters, which take care of executing the database queries. Requests from the distributed-data-model are sent to adapters in parallel; the limiting factor is the slowest node in the network to return data.
To ensure efficient reading of associations, we recommend using paired-end foreign keys for any associations among distributed data models. This lets associations be resolved directly from the read record itself, instead of needing to query multiple distributed Zendro instances for matching records.
Since Zendro requires a pagination argument, you need to think about what — and especially how much — data you’re requesting. Scaling a Zendro network up to include many nodes means that for each connected database, a query with the requested pagination is sent, and that data has to be collected in memory at the requesting node. This can grow out of proportion quickly if the network and the requested data become very large.
Authorization and authentication
Handling authorization and authentication in a network of Zendro instances requires some manual setup. The following guide gives solutions for Zendro’s default authorization setup using Keycloak. See also Authentication and authorization.
Generally we recommend using a single authorization endpoint for all Zendro nodes in the network, though depending on your needs, multiple authorization endpoints are also conceivable. This guide focuses on using a single endpoint.
Removing the docker containers and migration
Note: if you are not using docker to start up your Zendro services, do the equivalent steps on your local server, i.e. don’t start Keycloak on every Zendro node manually.
Since only one of the Zendro nodes should expose the Keycloak endpoint, remove the Keycloak services from your docker-compose files for all other Zendro nodes.
services:

  # comment or remove the following services:
  zendro-keycloak-postgres:
    container_name: zendro-keycloak-postgres
    ...

  zendro-keycloak:
    container_name: zendro-keycloak
    ...

  # Also make sure to remove the zendro-graphql-server dependency
  zendro-graphql-server:
    container_name: zendro-graphql-server
    # comment or remove the depends_on
    depends_on:
      - zendro-keycloak
    ...
You should also remove the Keycloak migration file from your migrations folder, to prevent Zendro from running it and failing. This migration only needs to run once, on the node that handles the Keycloak endpoint.
/<my-zendro-app>
|--- graphql-server
|    |--- migrations
|    |    |--- 2021-12-08T17_37_17.804Z#keycloak.js //remove this file
|    |    |--- ...
|    |--- ...
|--- ...
After doing this, zendro dockerize should not start the zendro-keycloak and zendro-keycloak-postgres services.
Create the Keycloak clients
To let all Zendro web clients in the network communicate with the Keycloak endpoint, they need to be registered as clients in Keycloak. This guide uses the Keycloak admin console.
Go to http://localhost:8081/auth/admin/zendro/console and log in with a Zendro user. The default user is:
username: zendro-admin
password: admin
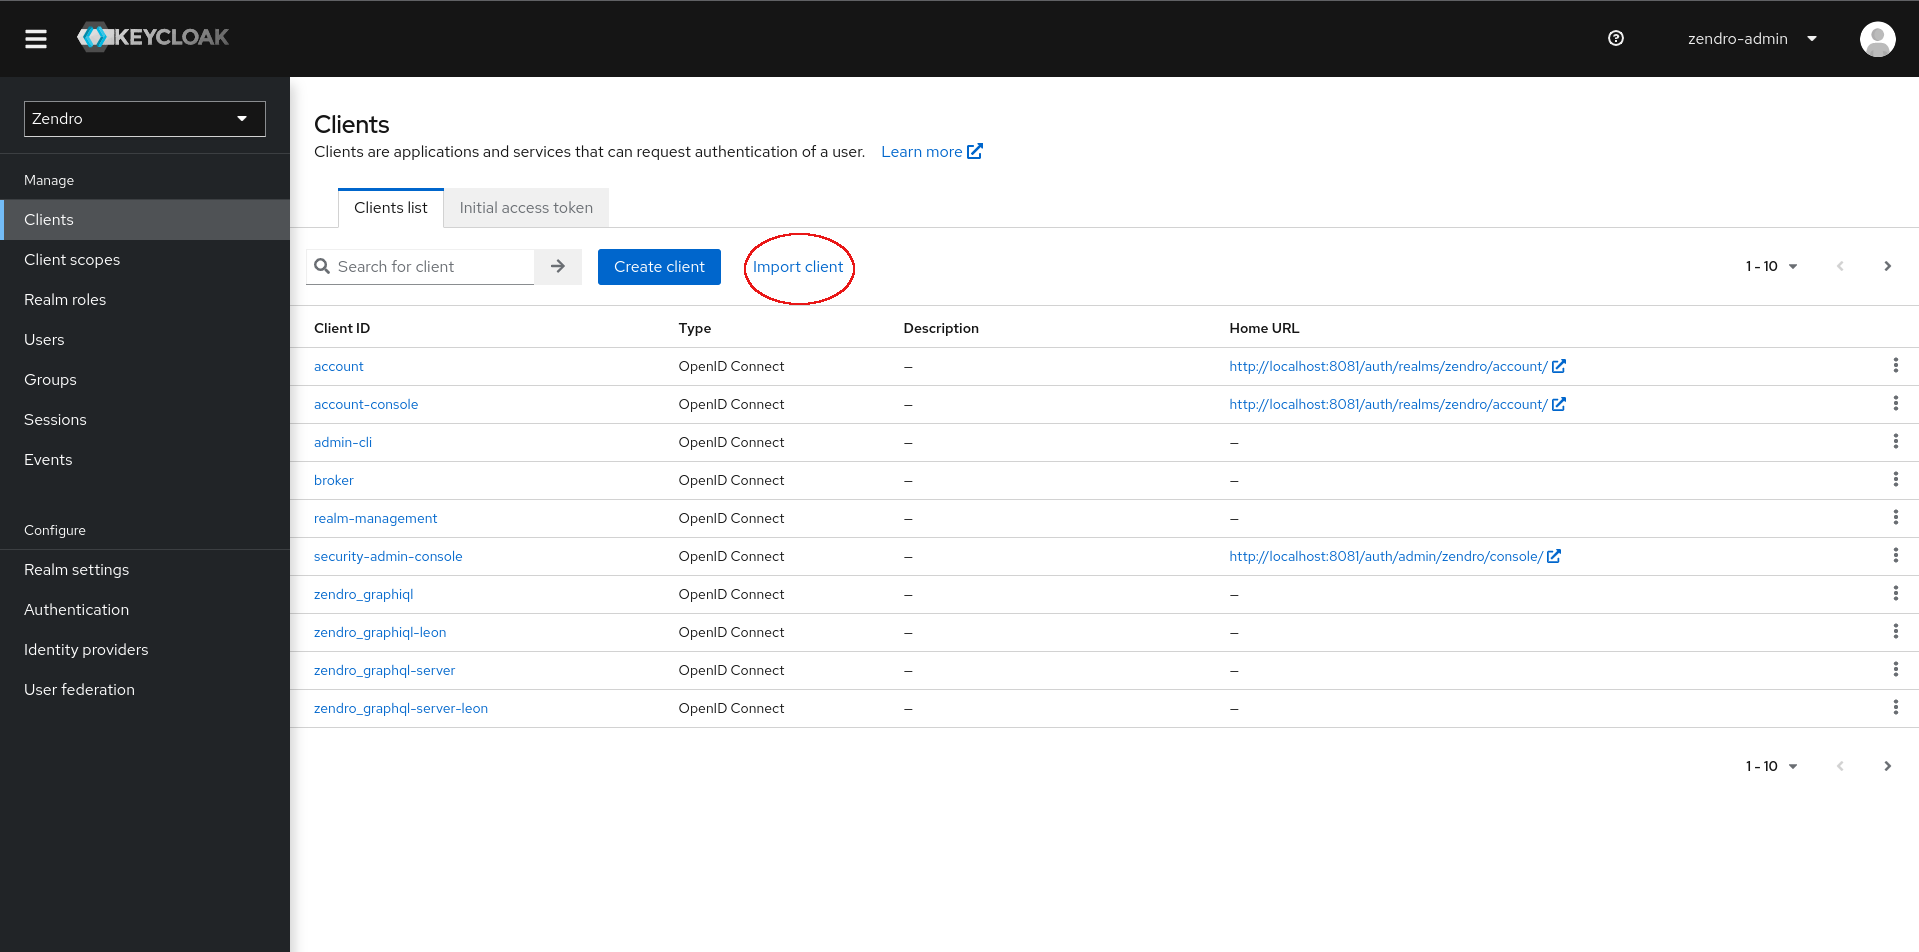
After logging in, go to the clients menu and click “import client”:
The default clients to import are in the config folder:
/<my-zendro-app>
|--- config
|    |--- zendro_graphiql.json
|    |--- zendro_spa.json
|    |--- zendro_graphql-server.json
|    |--- ...
|--- ...
Import both the zendro_graphiql.json and zendro_spa.json clients, changing their Client ID to something meaningful for the context of the Zendro network.
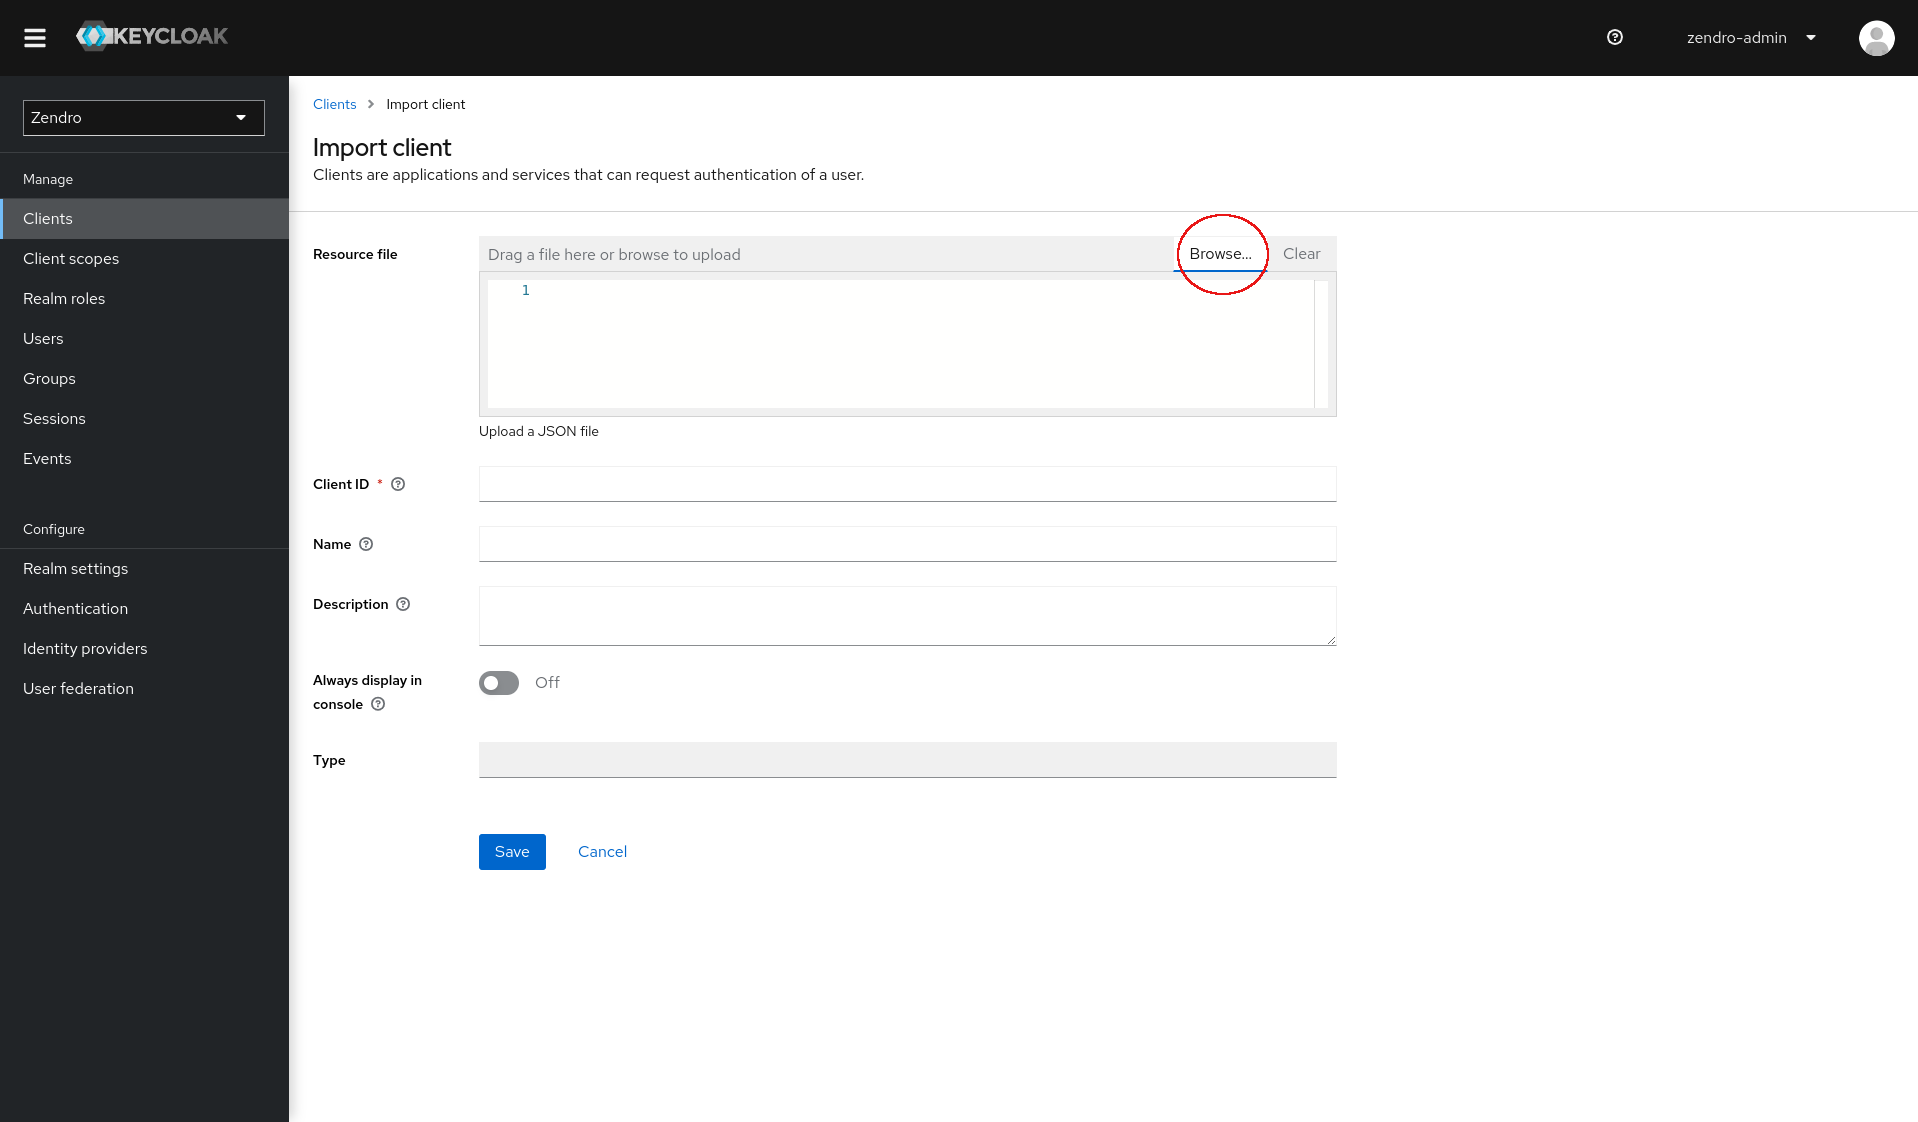
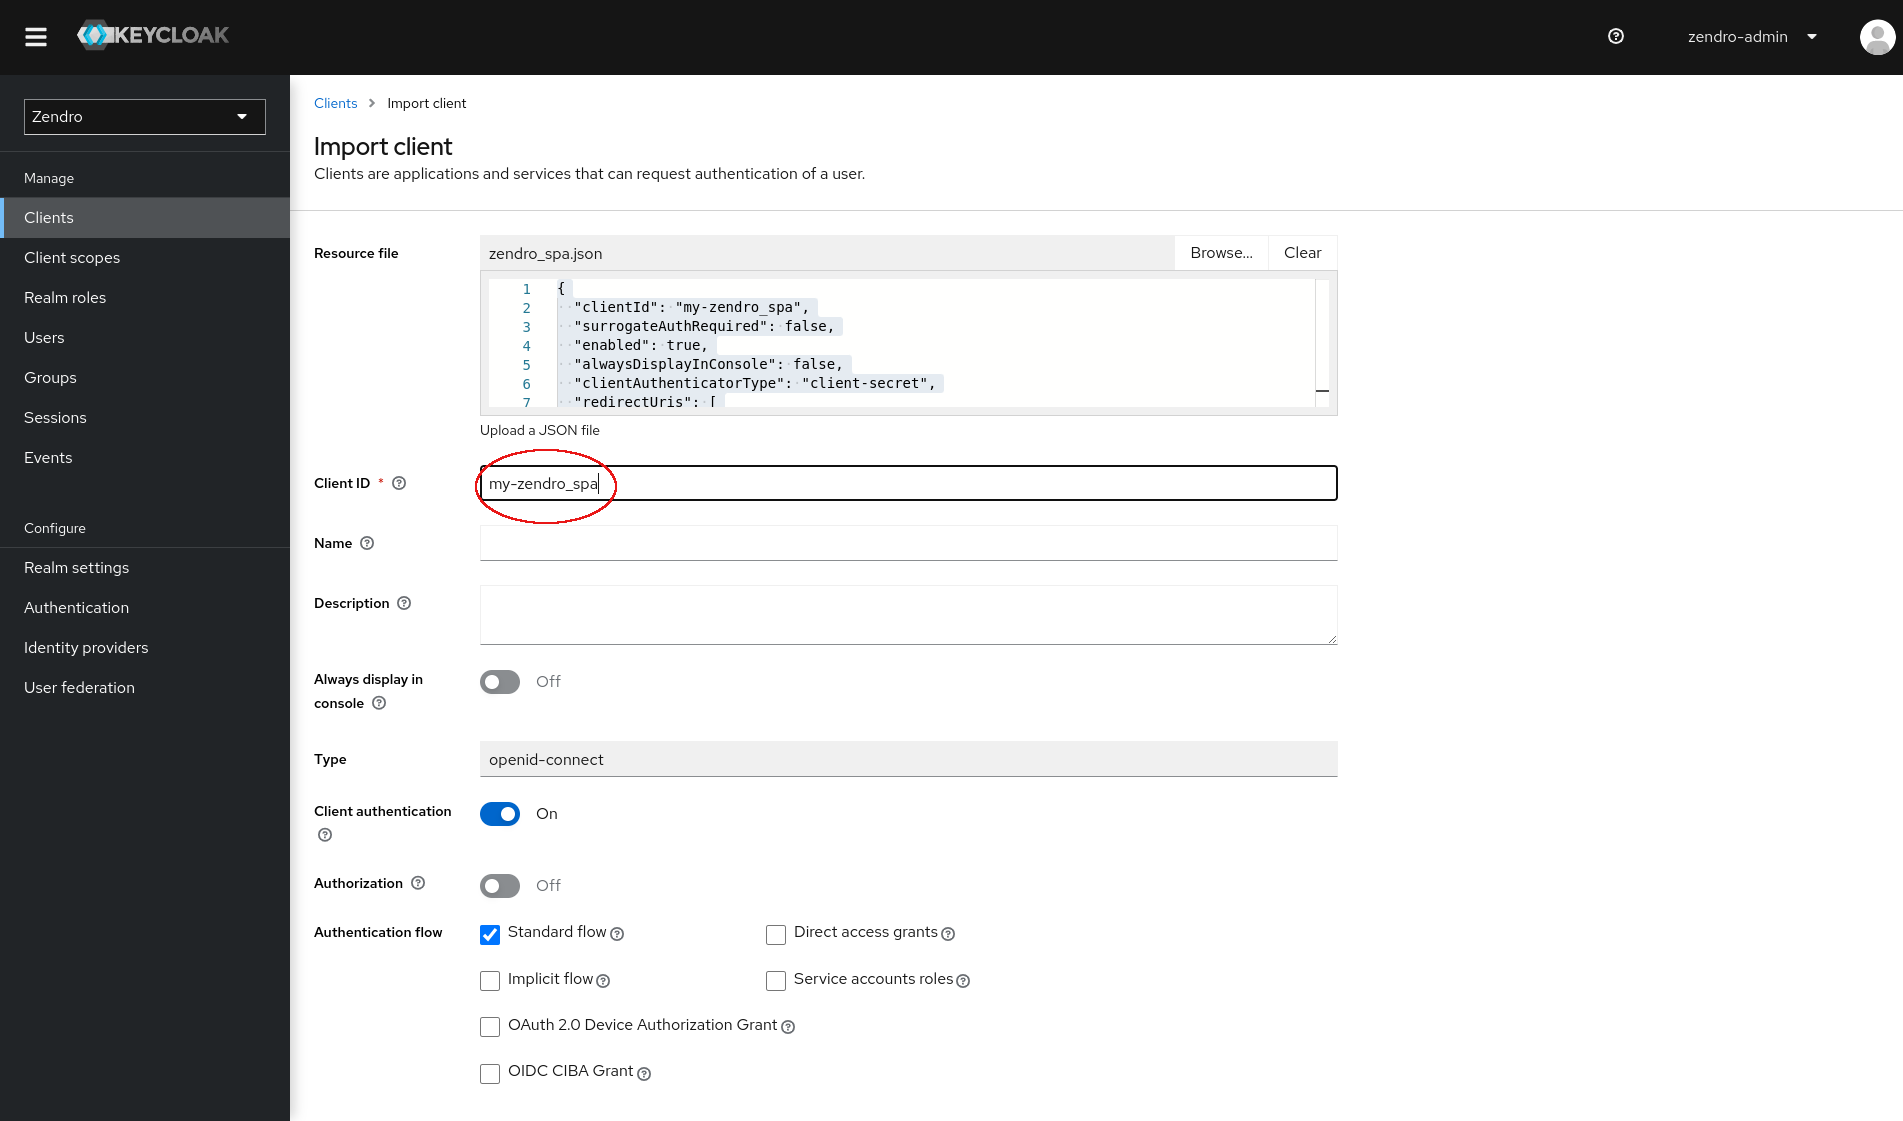
After importing, save the clients using the “Save” button at the end of the page.
Create the graphql-server client (optional)
If you want the graphql-server of any given Zendro node to communicate directly with Keycloak, you can also register it as a client. This is only necessary if you want users to be able to programmatically receive a token using credentials, or create roles specific to that Zendro instance. By default, the Zendro instance exposing Keycloak registers its own graphql-server as a client, so this step is not strictly necessary.
Follow the same steps as above, importing the zendro_graphql-server.json client and changing its name to something meaningful.
Roles
If you create a client for your graphql-server, it does not expose any client roles by default. If you want to use that endpoint to decode roles, or implement custom roles on that Zendro node, add those roles manually.
Note: the Zendro single-page-app expects at least an “editor” and a “reader” role to be present in the token.
Go to the newly created client and add the role in the roles tab using the “Create role” button:
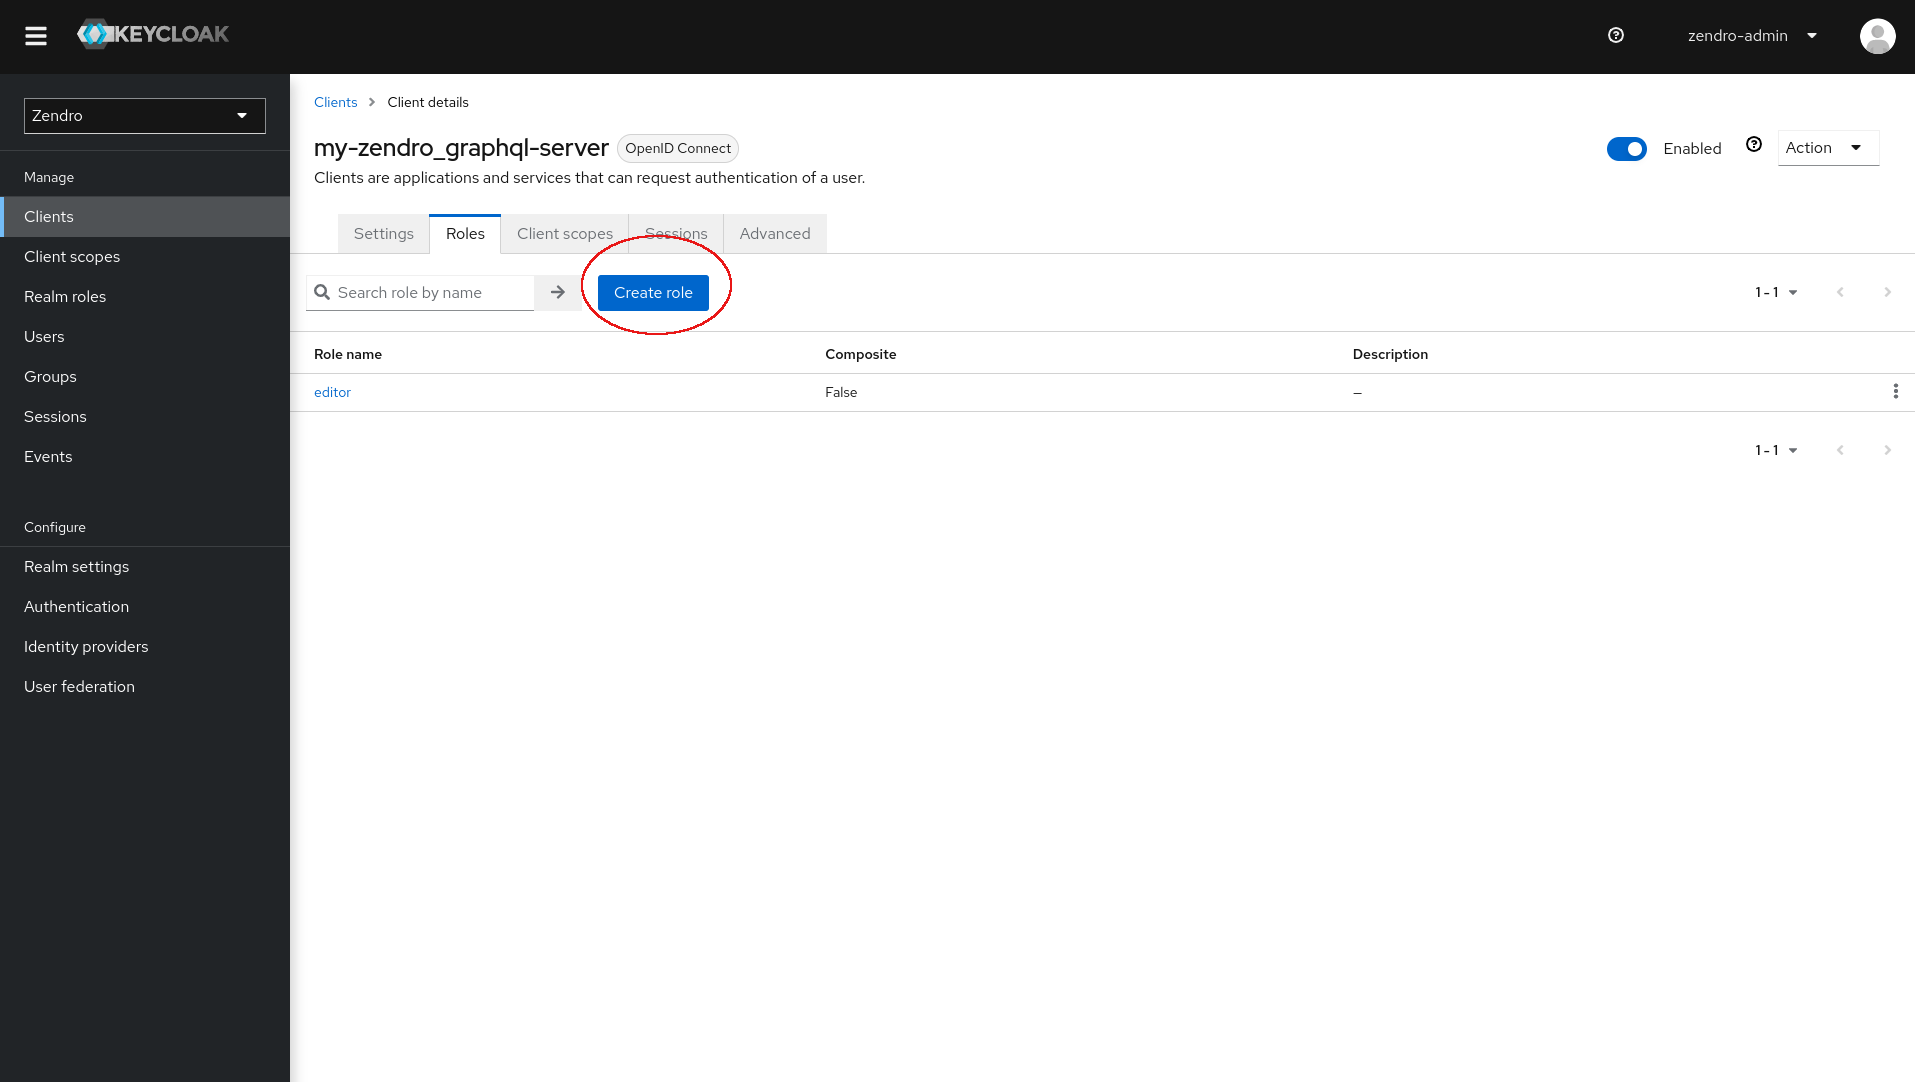
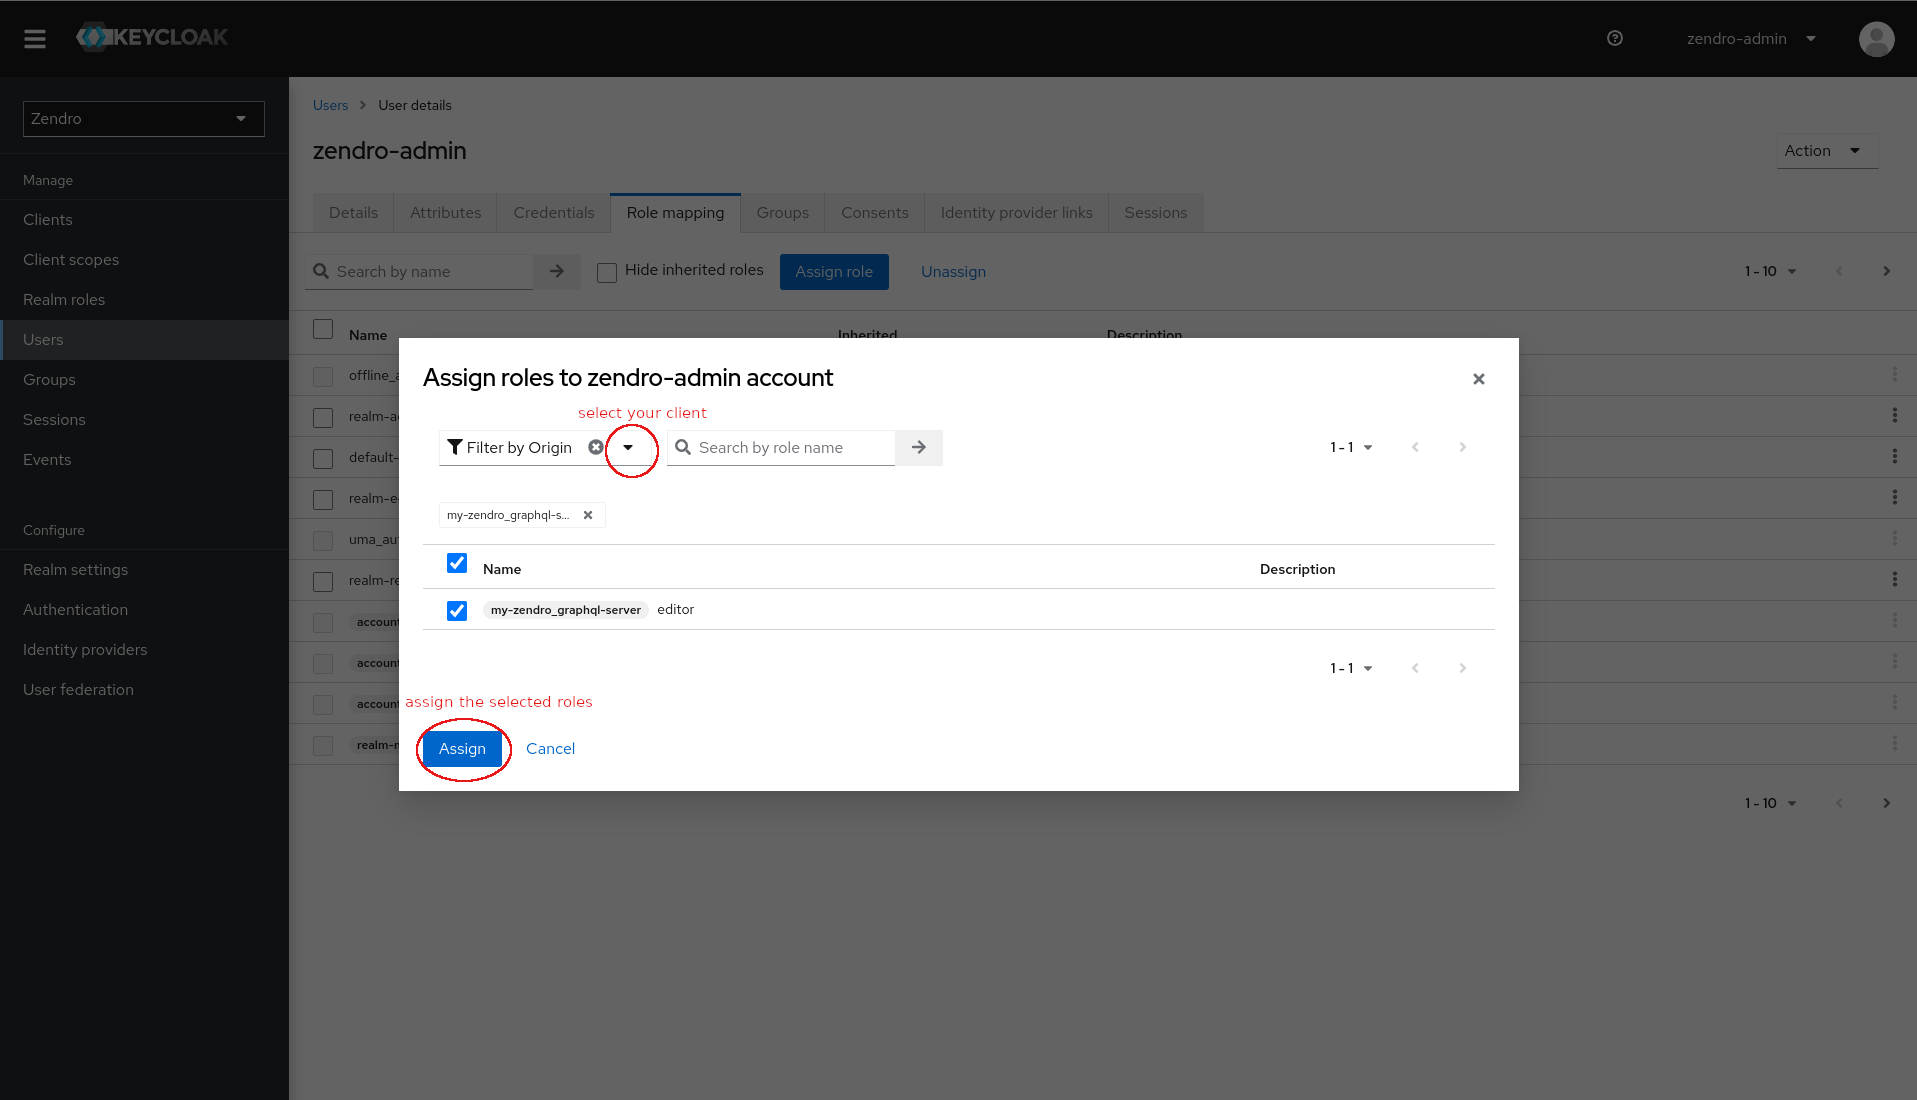
Any user can then be given the newly created client roles via the admin console.
In the “Users” menu, select a user, go to the “Role mapping” tab, click “Assign role”, filter by your client, and assign the role:
Setup the environment
After registering all necessary clients in Keycloak, the corresponding environment variables have to be set manually for the different Zendro services.
Web services
To make the web services aware of their Keycloak client representations, set OAUTH2_CLIENT_ID and OAUTH2_CLIENT_SECRET in the .env files:
/<my-zendro-app>
|--- single-page-app
|    |--- .env.development
|    |--- .env.production
|    |--- ...
|--- graphiql-auth
|    |--- .env.development
|    |--- .env.production
|    |--- ...
|--- ...
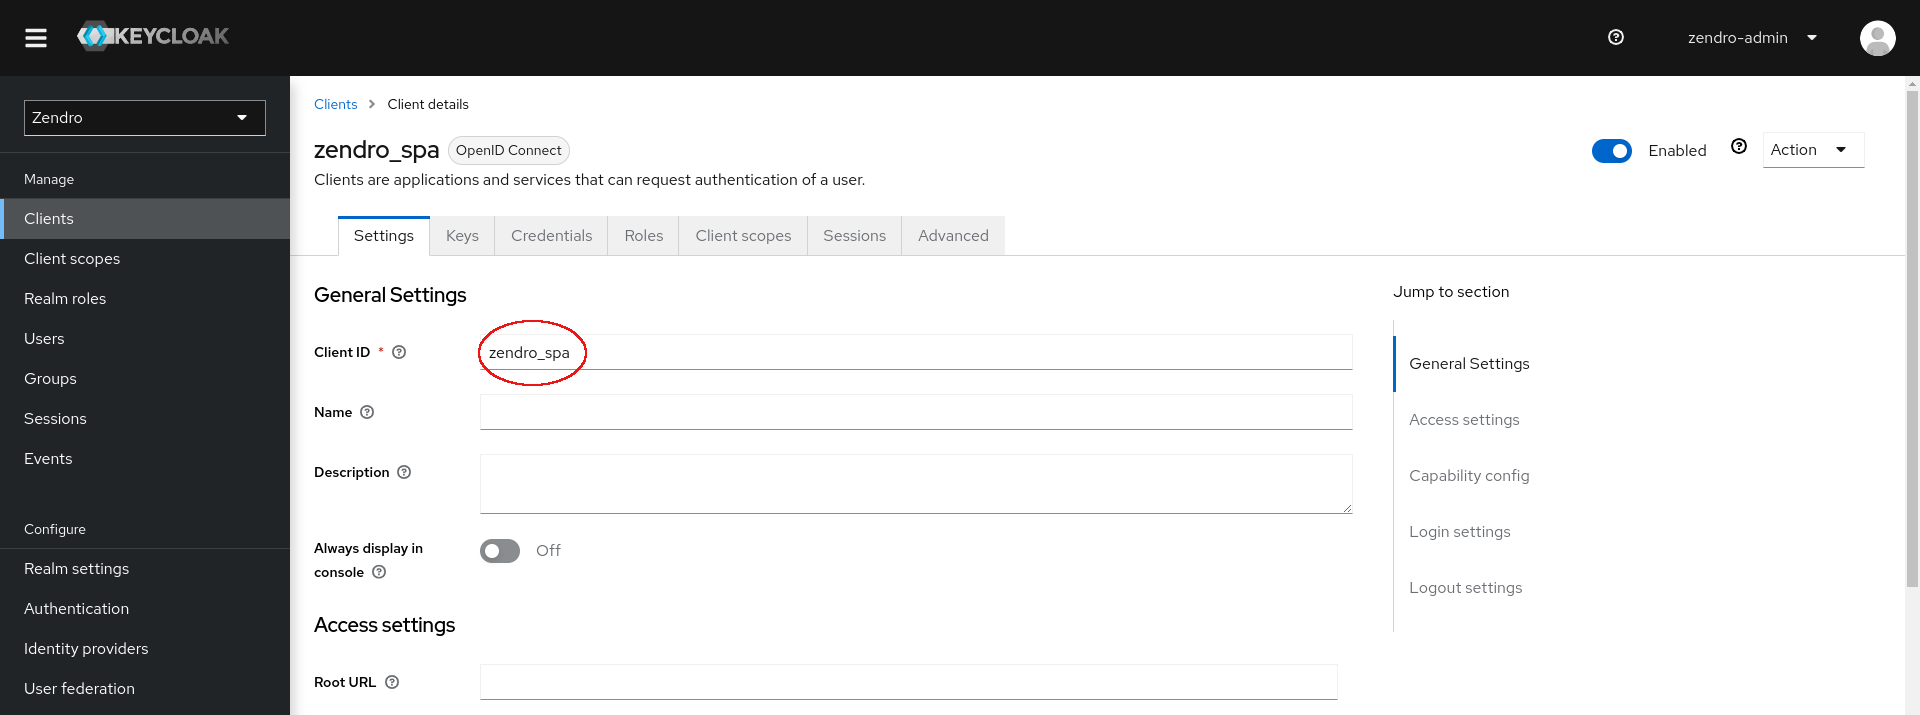
To find the client ID and secret, go to the “Clients” menu and select the corresponding client. The Client ID can be copied from there:
The client secret is in the “Credentials” tab:
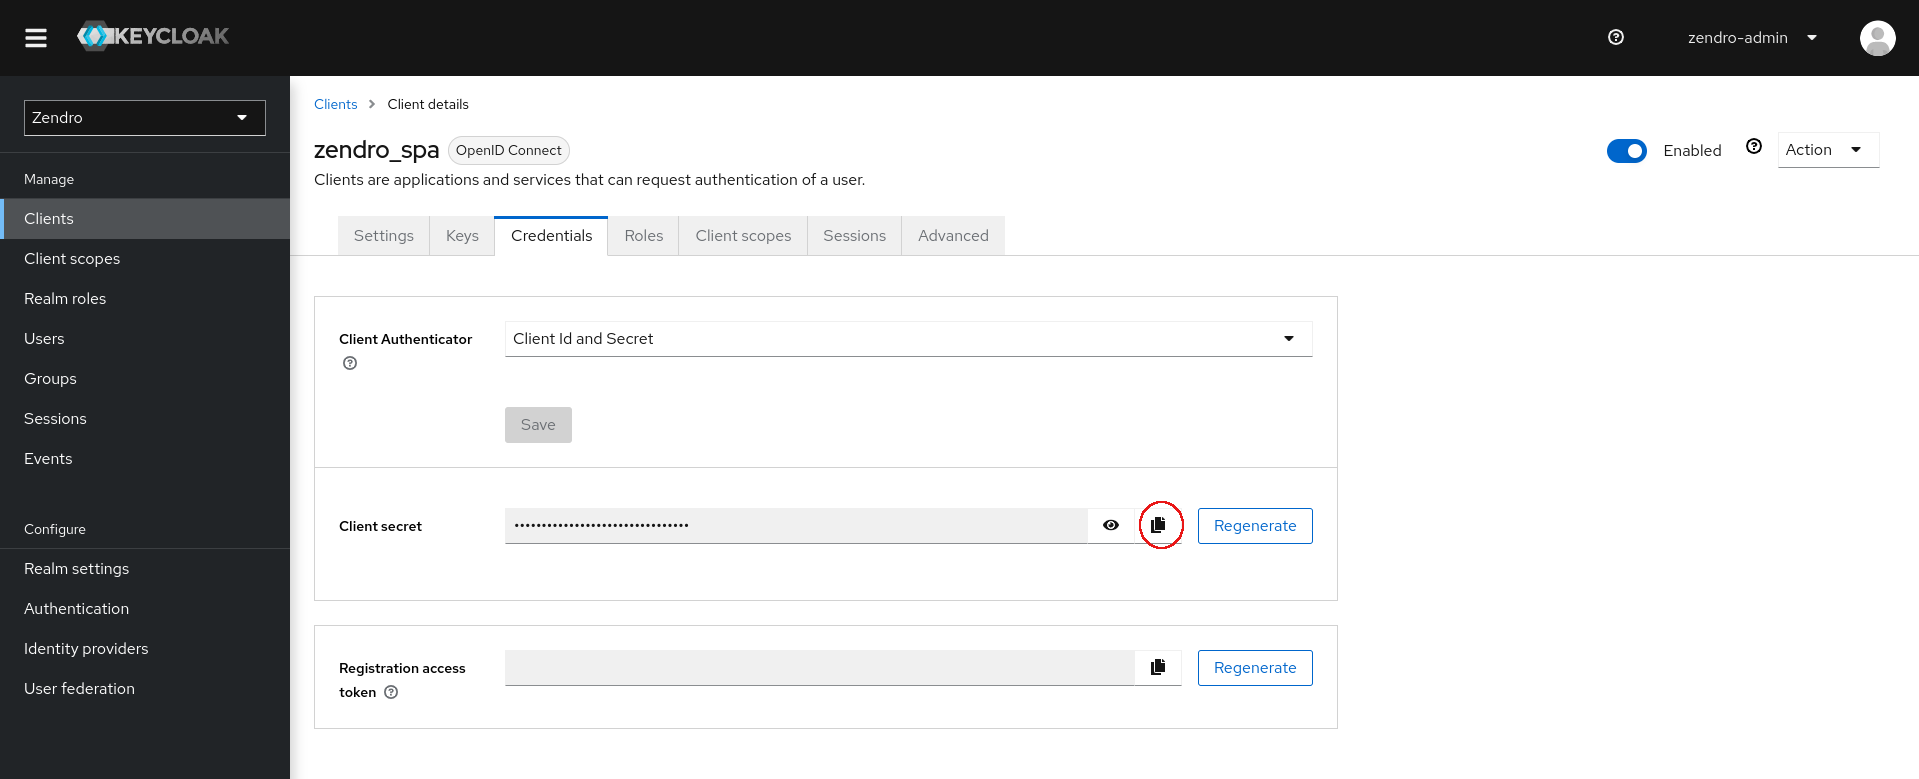
Copy and paste these two values into your single-page-app and graphiql-auth environment files:
# single-page-app .env(.development | .production)
OAUTH2_CLIENT_ID="<my-spa-client-id>"
OAUTH2_CLIENT_SECRET="<my-spa-client-secret>"

# graphiql-auth .env(.development | .production)
OAUTH2_CLIENT_ID="<my-graphiql-auth-client-id>"
OAUTH2_CLIENT_SECRET="<my-graphiql-auth-client-secret>"
Graphql-server
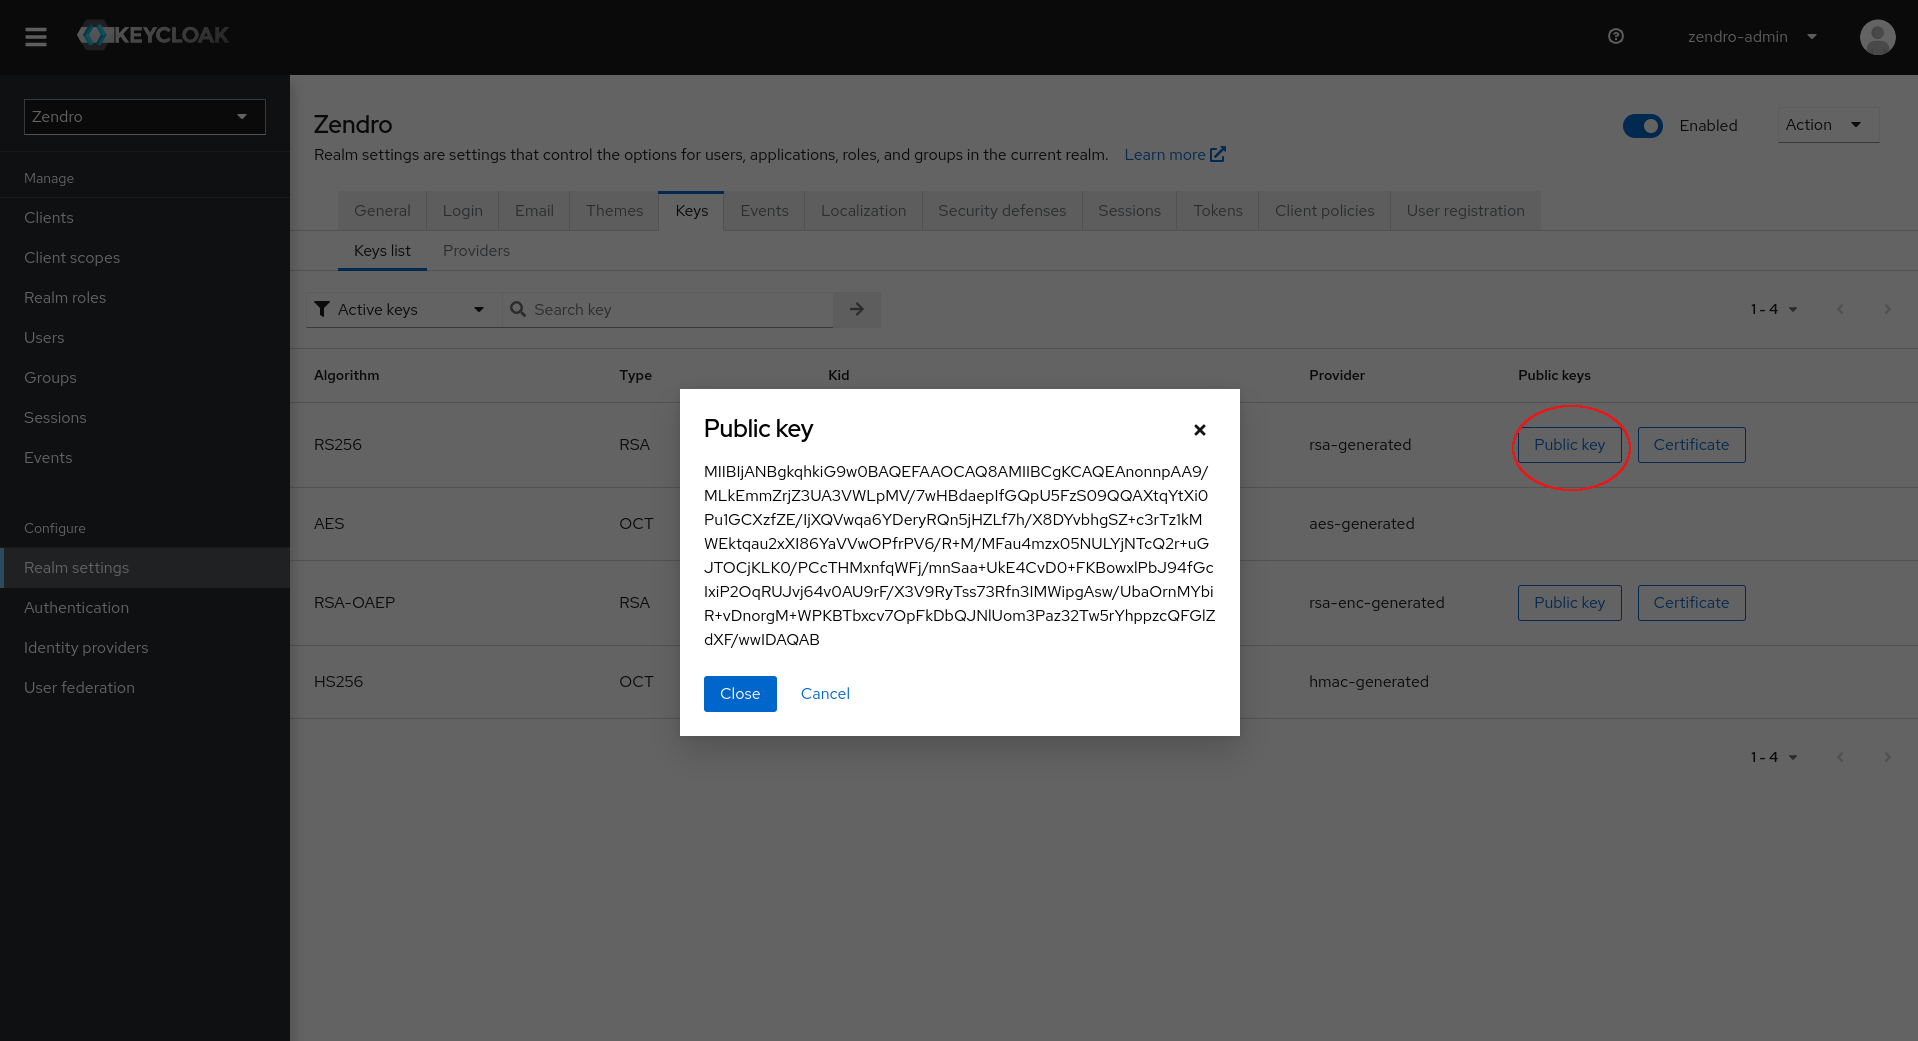
The graphql-server needs to be made aware of the Keycloak zendro-realm public key, via the OAUTH2_PUBLIC_KEY environment variable.
To get the public key, go to the “Realm settings” menu, find it under the “Keys” tab, click the “RS256” “Public key” button and copy the key:
Alternatively, find the public key by requesting http://localhost:8081/auth/realms/zendro (replace localhost:8081 with your Keycloak endpoint).
After copying the key, add it to the graphql-server .env file:
/<my-zendro-app>
|--- graphql-server
|    |--- .env
|    |--- ...
|--- ...
Note: make sure to include the public key signature:
OAUTH2_PUBLIC_KEY="-----BEGIN PUBLIC KEY-----\n<my-public-key>\n-----END PUBLIC KEY-----"
Depending on whether you created a separate client for the graphql-server, pass that Client ID via the OAUTH2_CLIENT_ID environment variable:
OAUTH2_CLIENT_ID="<my-graphql-server-client-id>"
This environment variable determines the resource from which the graphql-server decodes the user roles from the token. If you manually create roles, pass your Client ID here; if you want to use the default roles registered by the graphql-server, pass that server’s Client ID.
That’s it — you should now be able to log in from any of your Zendro web services using a central Keycloak authentication service.